|
|
|
|
|
|
|
|
|
Cranston Fine Arts  Military Art and Artists Featured Current Military Artists Mark Churms  Postcards |
[UP] - Medieval Era - Napoleonic Art - Jacobite Rebellion - American Military History - Crimean War - Zulu War - Colonial India - Modern Era - Original Paintings - Original Drawings - Postcards |
| Navigation | |
| Page 2 of 2 | Previous .. Page 2 |
|
|
|
|
|
|
|
|
|
| Navigation | |
| Page 2 of 2 | Previous .. Page 2 |
| Text for the above items : |
Charge of the Union Brigade at the Battle of Waterloo by Mark Churms (PC) At about 2.00pm the Union Brigade crashes through the ranks on Napoleons Ist Infantry Corps. The 2nd Royal North British Dragoons (later known as The Scots Greys) on the far left of the line, plow through Marcognets division, only Duruttes division will escape intact. With Brigade General Ponsortby at their head, elements of the now disordered Cavalry charge on to the French artillery. Even though, at close quarters, the Gunners and attached Infantry are no match for the wild Scots, they desperately try to save their 12 pounder field pieces. However the British heavy Cavalry is now out of control and Napoleons retribution will be swift. From the undulating ground before Paillotte comes the thunder of hooves and the deadly lances of 4th Regiment and the 3th Chasseurs a Cheval. In the confusion many of the British soldiers are completely unaware of the onslaught as the fresh French Cavalry sweeps through their flank. Ponsonbys mount leaps through the mud as the exhausted Brigade is herded together for the final kill. Even against all odds the brave men continue to fight. The Brigade General himself will shortly be sabred by Sergeant Urban as he attempts to capture the eagle of the 4th Lancers. |
March Past of the Grenadier Guards by Mark Churms (PC) The Duke of Wellington at the head of the 1st Foot Guards including the Colour Party, Hyde Park, 1829, as they pass King George IV with his staff and the Duke of Orleans while the band of the 2nd Life Guards perform. On the right of the picture is shown a Colonel of the 15th Hussars. Behind the figures can be seen Aspley House, the residence of the Duke of Wellington. |
Plugging the Gap by Mark Churms (PC) Lt Gonville Bromhead stands over Private Hitch, B Co. 2/24th. Rorkes Drift, front barricade |
The Charge of the Highlanders at the Battle of Prestonpans by Mark Churms (PC) Through the early morning Autumn mist, Highlanders of the Appin Regiment abandon their plaids and rush headlong across fields of stubble into the stunned ranks of Jonny Copes army. The force sent by the Crown to destroy the rebellion and capture the Pretender is itself utterly routed in a matter of minutes. The first major engagement of the uprising is a swift and complete victory for the Princes men. Except for the garrisons of Edinburgh, Stirling, Fort William and Fort Augustus, Scotland is now under the control of the Jacobites. |
Badajoz by Mark Churms (PC) On the night of 6th April 1812 Wellingtons Army, surrounding the walled Spanish town of Badajoz (garrisoned by Napoleons soldiers under general Baron Philippon) is ready to attack! The men of the 45th regiment from Pictons 3rd Division launch themselves in a desperate and bloody assault against the north castle wall. Carrying improvised ladders, the men have their top buttons undone, overalls rolled up and are stripped for action. The castles defenders (Germans, allied to Napoleon of the Graf und Erbprinz Regiment from Hesse-Darmstadt) partroling the walls in their greatcoats are intially surprised by the bold assault from this sector but they have been preparing the strong defenses for some time. Soon the night air is full of musketry, falling masonry, burning bundles of ropes and exploding grenades or mines. Despite the horrific casualties suffered the attackers press home. As the first scaling ladders are raised near a small bell tower the young Lt. James Macpherson reaches for the top of the wall. The ladders are too short! Undaunted he cries to his men below to lift the base of the ladder closer to the wall. This rapid, vertical movement suddenly propels him to a height several feet above the Germans heads. A shot rings out as one of the defenders fires point blank into the young mans chest. Fortunately the lead ball only strikes a glancing blow, cleaving in two a button of the officers waist coat and dislocating one of his ribs. Despite his fortunate escape, the force of the impact nearly sends him tumbling from the ladder. Somehow he maintains his grasp but the ladder itself gives way under the weight of the men following. Some unfortunates are impaled on the bayonets of their comrades below. Leaping from the rungs of another ladder, Corporal Kelly is the first man over the top and gradually the 45th gain a foothold on the ramparts. The rest of the regiment is ordered to unfix bayonets. Using the few remaining ladders, others also manage to scale the walls. Through the carnage they climb, club and shoot their way into the castle itself! Maepherson now regains consciousness at the foot of the wall and revived with a cup of coco from his friend A.A. General Hercules Packenham, who was directly behind him on the ladder when it broke. Though winded by the shot he rises to his feet. This sudden movement relocates his rib and he is able to climb the ladders once more. Once over the defense he sees the old towers of Apendez and Albar-rana to his left and the cathedral illuminated by gun fire in the distance. However his objective is directly ahead. Atop the abandoned tower of Santa Maria before him still flies the French tricolour. Macplierson seizes the opportunity, mounts the spiral stairway to the top turret and pulls down the enemy flag. For want of a substitute he flies his own red jacket from the pole, signifying that the castle has fallen. In the rest of the town the fighting continues and turns into a blood lust. Badajoz is one of the bloodiest and violent sieges of the Peninsula War. On the following day Maepherson presents his trophy to the Duke of Wellington himself but his bravery is not rewarded with a promotion. |
Assault on the Breach of San Sebastian by Mark Churms (PC) The Storming party, 750 volunteers, included 200 men of the Guards, one hundred each from the First and Coldstream Guards. They moved off at two in the morning on the 31st August 1813, and occupied a ruined convent where they remained till half past nine. Aware of the almost impossible task ahead of them, and subjected to a violent electric thunderstorm, the troops waited in a state of savage anticipation. Wild senseless laughter was said to have preceded the attack on the breach which could not be entered except in single file under heavy fire. The troops attacked in succession, but were struck down by hundreds. General Graham then ordered the artillery to fire over the heads of the assailants, clearing the ramparts. A shell ignited a quantity of powder, and under cover of the explosions, the storming party forced its way into the town. San Sebastian was savagely sacked and burned, and the good name of Wellingtons Army suffered as it had done at Badajoz. The civilians were raped, robbed and murdered in revenge for the heavy losses suffered by the troops. The Franco-Spanish governor retired the citadel (San Marcial) and on the 9th September, after a gallant resistance of over a week, surrendered the charge he had so faithfully defended. The casualties among the officers of the first Guards were one Officer, Ensign Burrard, First battalion (a son of Sir Henry Burrard who was responsible for the disastrous Treaty of Cintra) severely wounded, since dead, and one Officer, Ensign Orlando Bridgeman, wounded. In the Coldstream Guards, one officer ensign Thomas Chaplin, According to Lord Saltoun there were in round numbers, 150 casualties amongst 200 Guardsman. Total losses of volunteers from all regiments were 1500 men. (text by Atlanta Clifford, assistant to the Curator-The Guards Museum) In the painting. you see Ensign Chaplin lying wounded, attended by an Officer of the Coldstream Guards, Orlando Bridgeman is calling Assistant Surgeon Bacot, First Foot Guards, to go to the aid of his fellow officer, Burrard. |
Hougoumont by Mark Churms (PC) Depicting Jeromes Infantry attacking the South gate of the Chateau during the battle of Waterloo. |
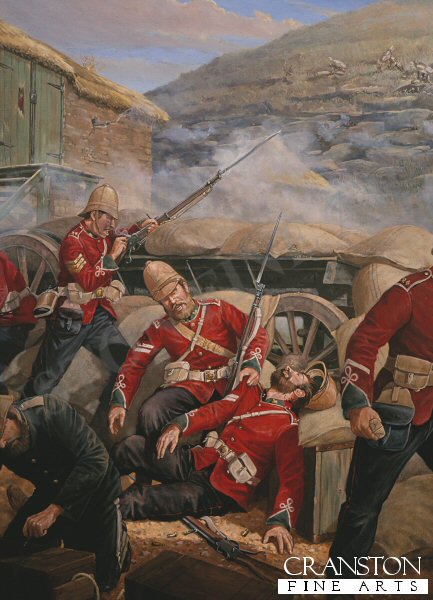
Wounded by Mark Churms (PC) Corporal Allen and Corporal Lyons, B. Company 2nd Battalion 24th Foot Rorkes Drift Back Wall, 6pm January 22nd 1879. After the initial Zulu assault on the back wall of the post failed at about 4.30pm, a fire-fight broke out between Zulu snipers posted on the terraces of the Shiyane (Oskarsberg) Hill and the defenders posted behind the barricade of wagons and mealie-bags. This section of the wall as commanded by Sergeant Henry Gallagher, of B Company. At about 6 pm, Corporal Lyons was leaning over the barricade to aim when he was hit in the neck by a bullet which paralysed him; as his friend, Corporal Allen, bent to help him, Allen too was shot through the arm. In the foreground Corporal Attwood of the Army Service Corps distributes ammunition. The wall was abandoned shortly after and the British retired to the small are in front of the storehouse. Allen was later awarded the VC, and Attwood the DCM. He was born at Churcham, Gloucestershire, and served for five years in the Monmouthshire Militia before joining the 24th Regiment. He served through the Kaffir War 1877-8 before his bravery at Rorkes Drift for which he was presented with the Victoria Cross by Lord Wolseley on August 3rd 1879. He later served in the 1st Volunteers Battalion Royal Fusiliers. |
Crockett's Last Sunrise, at the Battle of the Alamo by Mark Churms (PC) Crocket is shown at the Barricades at 6am on the 5th March 1836. The siege of the Alamo ended on March 6th, when the Mexican army attacked while the Alamo defenders were sleeping. The garrison defenders awakened, and the final fight began. One of the women who were gathered in the chapel witnessed Crockett running to his post, Crockett paused briefly in the chapel to pray. But when the Mexican soldiers breached the outer walls of the Alamo complex, most of Crocket and the defending Texians fell back to the barracks and the chapel area which had been the plan. Davy Crockett and his men were too far from the barracks to be able to take shelter and were the last remaining defenders within the mission to be in the open. The men desperatly defended the low wall in front of the church, using their rifles as clubs and using there knives in close combat as the Mexican troops were too close and made it impossible to reload their rifles. After a volley of fire and a charge with fixed bayonets, Mexican soldiers pushed the few remaining Texans back toward the church and soon after the Battle for the Alamo had ended after lasting 90 minutes. It is said that the body of Crockett was surrounded by up to 12 Mexican soldiers bodies and one with Crocketts knife in him. |
|
Contact Details |
Sign Up To Our Newsletter!
This website is owned by Cranston Fine Arts. Torwood House, Torwoodhill Road, Rhu, Helensburgh, Scotland, G848LE Contact: Tel: (+44) (0) 1436 820269. Email: cranstonorders -at- outlook.com
|