|
|
|
|
|
|
|
|
|
Cranston Fine Arts  Military Art and Artists Featured Current Military Artists Jason Askew Military Art and Artists Featured Current Military Artists Jason Askew  Postcards Postcards |
[UP] - Napoleonic Art - Zulu Wars - World War One - World War Two - Original Paintings - Original Drawings - Postcards |
| Navigation | |
| Page 1 of 2 | Page 1 .. Next |
|
|
|
|
|
|
|
|
|
|
|
|
|
|
|
|
|
|
|
|
|
| Navigation | |
| Page 1 of 2 | Page 1 .. Next |
| Text for the above items : |
Defence of Hougoumont Farm at the Battle of Waterloo by Jason Askew. (PC) The British 1st Foot Guards and Coldstream Guards rush to defend the gate of Hougoumont Farm against a fierce French attack during the battle of Waterloo. During the battle, the Coldstream Guards lost 97 killed, 446 wounded and 4 missing, while the 1st Foot Guards lost 125 killed and 352 wounded. |
The Ludendorff Offensive, Spring 1918 by Jason Askew. (PC) No text for this item |
2nd Australian Brigade fighting in Gully Ravine by Jason Askew. (PC) The 2nd Australian Brigade were brought up to reinforce the British attempt to force the Turkish positions at Achi-baba. This action developed into the second Battle of Krithia. |
The Inniskillings at Waterloo by Jason Askew. (PC) The 6th Inniskillings were part of the Union Brigade of Heavy Cavalry alongside the 1st Dragoons (Royals) and 2nd Dragoons (Scots Greys) and commanded by General Ponsonby. At a critical point in the battle, at 2.00 pm, the two brigades of Heavy Cavalry (the other was the Household Brigade) were ordered to charge a massive French assault of infantry and cavalry which was bearing down on the allied line. The charge of the Heavy Cavalry saved the day. The Union Brigade smashed into the French infantry and then on to the artillery. But the charge carried on too far and the Inniskillings were attacked by fresh French cavalry and suffered heavy casualties: 193 out of 400, plus 190 horses. |
Inniskilling Dragoons at Amiens by Jason Askew. (PC) The Inniskilling Dragoons capturing a German railway gun at Harbonnieres during the battle of Amiens, 1918. |
The Fight for Sainte-Marie-du-Mont by Jason Askew. (PC) No text for this item |
Easy Company, 101st Airborne Division by Jason Askew. (PC) Paratroopers of Easy Company,101st Airborne Division, take cover in a doorway during the Screaming eagles' penetration of the town of Sainte-Marie-du-Mont, France, on D-Day, June 6, 1944. |
US 4th Division, Utah Beach, D-Day, 6th June 1944 by Jason Askew. (PC) Utah beach was the great American success story of D-day. Compared to the difficulties encountered on Omaha beach, the casualties suffered by the American 4th Division on Utah beach were described as 'light'. Although tactical problems were encountered on the Utah beach landings, i.e. the loss of many of the landing control teams, the strong tide causing problems, German placed mines sinking vessels, and the overall atmosphere of fog / low visibility, the American infantry were able to subdue and overcome the German beach defences and penetrate inland, with much greater speed than the divisions that landed on Omaha. Terrain played a role with regard to the difference in combat experience between the two American beaches. The high bluffs at Omaha gave the German defenders a certain geographical advantage, whereas the low-lying sand dunes at Utah favored the mobility of the American infantry and armor. The low-lying terrain at Utah also favored the Allied air bombardment. Brigadier General Theodore Roosevelt Jr, the President's son, landed with the first wave at Utah beach. Roosevelt, together with the 8th Infantry regiment's commanding officer, James Van Fleet, directed the tactical battle on Utah beach, and coordinated the American advance inland. |
The Battle of Isandlwana by Jason Askew. (PC) The Battle of Isandlwana on 22 January 1879 was the first major encounter in the Anglo-Zulu War between the British Empire and the Zulu Kingdom. Eleven days after the British commenced their invasion of Zululand in South Africa, a Zulu force of some 10,000-12,000 warriors attacked a portion of the British main column consisting of about 1,800 British, colonial and native troops and perhaps 400 civilians. The Zulus were equipped mainly with the traditional Assegai iron spears and cow-hide shields, but also had a number of muskets and old rifles though they were not formally trained in their use. The British and colonial troops were armed with the state-of-the-art Martini-Henry breech-loading rifle and two 7 pounder artillery pieces as well as a rocket battery. Despite a vast disadvantage in weapons technology, the numerically superior Zulus ultimately overwhelmed the poorly led and badly deployed British, killing over 1,300 troops, including all those out on the forward firing line. The Zulu army suffered around 350 killed, and up to several hundred wounded. The battle was a crushing victory for the Zulus and caused the abandonment of the first British invasion of Zululand. |
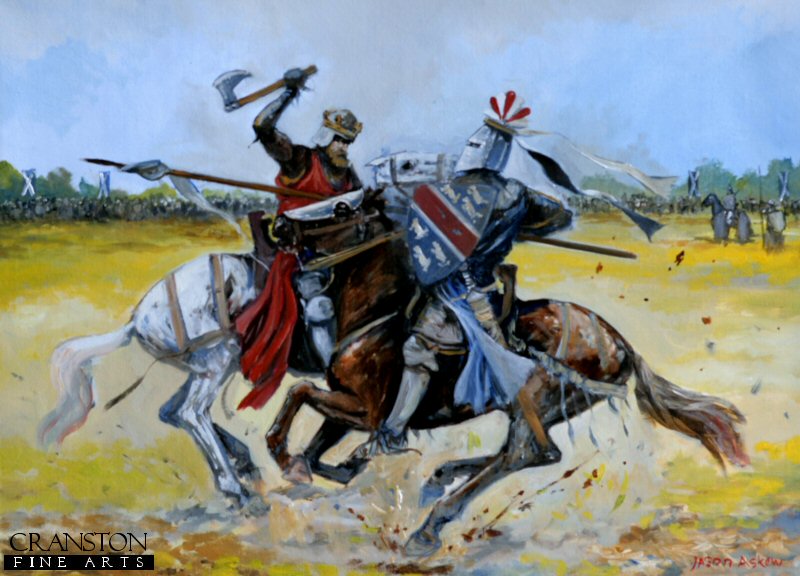
Robert the Bruce by Jason Askew. (PC) Far ahead of Edward II's main army, marching from Falkirk to relieve Stirling Castle, rides the English vanguard. Late on that day, 23rd June 1314, these horsemen advance along the Roman road and cross Bannockburn. Robert the Bruce, King of Scots, rides out ahead of his formations to observe the enemy's advance. One of the English Knights, Sir Henry De Bohun, seeing the King's vulnerable position, gallops ahead of his fellows to engage Bruce in single combat. Undaunted, the King holds his ground. Skillfully turning his mount away from the thrust of the Knights deadly lance in one movement he swings his battle axe down upon his enemy's head with such force that the handle is shattered and the unfortunate attackers skull is split in two. |
The Battle of Aliwal by Jason Askew. (PC) The Battle of Aliwal was fought on 28th January 1846 between the British and the Sikhs. The British were led by Sir Harry Smith, while the Sikhs were led by Ranjodh Singh Majithia. The British won a victory which is sometimes regarded as the turning point of the First Anglo-Sikh War. The Sikhs had occupied a position 4 miles (6.4 km) long, which ran along a ridge between the villages of Aliwal, on the Sutlej, and Bhundri. The Sutlej ran close to their rear for the entire length of their line, making it difficult for them to manoeuvre and also potentially disastrous if they were forced to retreat. After the initial artillery salvoes, Smith determined that Aliwal was the Sikh weak point. He sent two of his four infantry brigades to capture the village, from where they could enfilade the Sikh centre. They seized the village, and began pressing forwards to threaten the fords across the Sutlej. As the Sikhs tried to swing back their left, pivoting on Bhundri, some of their cavalry tried to threaten the open British left flank. A British and Indian cavalry brigade, led by the 16th Lancers, charged and dispersed them. The 16th Lancers then attacked a large body of Sikh infantry. These were battalions organised and trained in contemporary European fashion by Neapolitan mercenary, Paolo Di Avitabile. They formed square to receive cavalry, as most European armies did. Nevertheless, the 16th Lancers broke them, with heavy casualties. The infantry in the Sikh centre tried to defend a nullah (dry stream bed), but were enfiladed and forced into the open by a Bengal infantry regiment, and then cut down by fire from Smith's batteries of Bengal Horse Artillery. Unlike most of the battles of both Anglo-Sikh Wars, when the Sikhs at Aliwal began to retreat, the retreat quickly turned into a disorderly rout across the fords. Most of the Sikh guns were abandoned, either on the river bank or in the fords, along with all baggage, tents and supplies. They lost 2,000 men and 67 guns. Comment from the artist, Jason Askew. This painting shows the extremely violent and brutal clash between British cavalry (16th Lancers) and Sikh infantry at the battle of Aliwal. The Sikh infantry formed 2 triangles, a version of the famous Allied/British squares used at Waterloo, but the Sikhs, after firing a ragged volley at the attacking horsemen, dropped their muskets and assaulted the cavalry with their traditional Tulwars (sabres) and dhal shields. These shields are also used offensively, to punch, and to slice with the edge. Although the British horsemen claimed a victory as they felt they successfully dispersed the Sikh triangles, and forced the Sikh infantry to retreat to the nullah (dry stream bed) in the Sikh rear, this opinion is open to debate. The Sikhs traditionally fought in loose formations, with tulwar and shield-taking full advantage of their abilities as swordsmen, blades being weapons with which the Sikhs are particularly skilled in the use of. The Sikhs actually inflicted more casualties on the 16th Lancers than the lancers inflicted on the Sikh infantry. British eye witnesses spoke of the sight of the grotesquely swollen and distorted dead bodies of men and horses of the Her Majesty's 16th Lancers, stinking in the sun and littering the ground at Aliwal - testimony to the progress of their charge. The regiment lost 27% of effectives out of a total strength of over 400 effectives. The lancers were dreadfully hacked about, many being cruelly maimed for life, losing hands and limbs to the slashing strokes of the Sikh blades. The Sikhs had no compassion for the cavalry horses either - many of the poor animals (over 100 by some accounts) had to be shot, due to having their legs hacked clean off, or being literally disemboweled by Sikh Tulwars. In the painting, the central figure with the wizard-shaped Turban, is in fact an Akali - a sect of extremely religious Sikhs, who disdained the use of armour, and often fought to the death with a fanatical and suicidal devotion. |
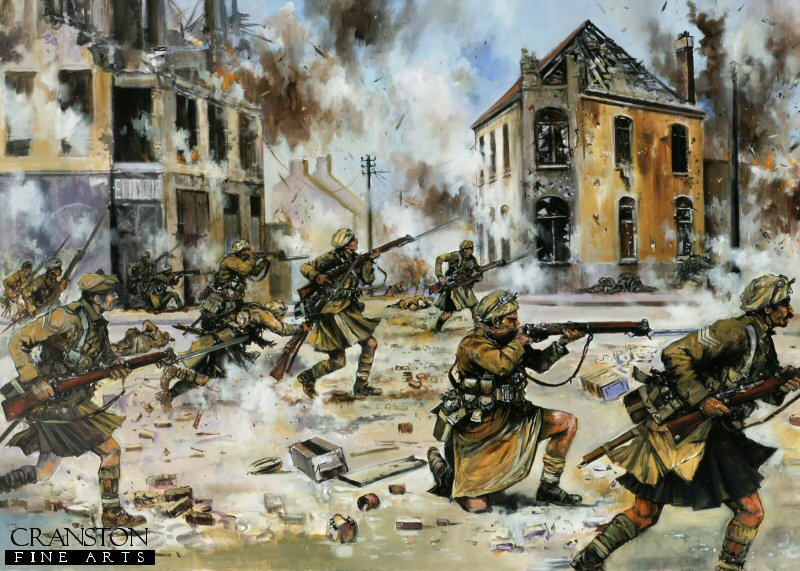
Cameron Highlanders Capture a German Force on the Yser by Jason Askew. (PC) This incident took place on October 23rd,1914. A party of German soldiers had been driven to take shelter in the small house. British artillery then targeted the house, making the situation of the Germans uncomfortable. Under cover of the bombardment, a company of Cameron Highlanders rushed the position, intercepting the Germans as they tried to extricate themselves. After a brief struggle, and being somewhat unnerved by the prompt appearance of the Highlanders; the German group surrendered. |
Spion Kop - South Africa, 24th January 1900 by Jason Askew. (PC) I am the commander here, take your men back to hell, sir! I allow no surrenders :- Lt Colonel Alexander Thorneycroft, of the Thorneycrofts Mounted Infantry, and the 2nd Battalion, Middlesex regiment. They then charged Boer skirmishers in support of the beleaguered Lancashire Fusiliers on the summit of Spion Kop, at 13.00 on the 24th January 1900. |
Rorkes Drift 22nd January 1879 - Defending the Hospital by Jason Askew. (PC) By about 6pm the Zulu attacks had extended all around the front of the post, and fighting raged at hand-to-hand along the mealie-bag wall. Lieutenant Chard himself took up a position on the barricade, firing over the mealie-bags with a Martini-Henry, whilst Lieutenant Bromhead directed any spare men to plug the gaps in the line. The men in the yard and on the front wall were dangerously exposed to the fire of Zulu marksmen posted in the rocky terraces on Shiyane (Oskarsberg) hill behind the post. Several men were hit, including Acting Assistant Commissary Dalton, and Corporal Allen of the 14th. Surgeon Reynolds treated the wounded as best he could despite the fire. Once the veranda at the front of the hospital had been abandoned, the Zulus had mounted a determined attack on the building itself, setting fire to the thatched roof with spears tied with burning grass. The defenders were forced to evacuate the patients room by room, eventually passing them out through a small window into the open yard. Shortly after 6pm Chard decided that the Zulu pressure was too great, and ordered a withdrawal to a barricade of biscuit boxes which had been hastily erected across the yard, from the corner of the store-house to the front mealie-bag wall. In this small compound the garrison would fight for their lives throughout most of the coming night. |
Rorkes Drift by Jason Askew. (PC) The painting depicts the climax of the Zulu attacks at the defence of Rorkes Drift. The Zulus were unable to effectively penetrate the mealie bag defenses at Rorkes Drift, even though they succeeded in burning down the hospital, and peppering the storehouse with bullet holes. The confined space available to the British garrison caused a certain degree of physical compression, but this in fact worked against the Zulus, as it drove the defenders closer together with the result being that the volley fire from the defenders was concentrated and subsequently very effective at close range, as opposed to the spread out skirmish line type formation used at Isandlwhana. The Zulu attacks also became uncoordinated, being driven forward by charismatic individuals, but lacking the support of the necessary numbers needed to overwhelm the desperate defenders, who now appreciated that they were literally fighting for their lives. |
Taking Sainte-Marie-du-Mont by Jason Askew. (PC) No text for this item |
Faster Boys - Give Them Hell! Loos, September 25th 1915 by Jason Askew. (PC) Dawn. British artillery thundered, and the territorial soldiers 15th Scottish division stormed towards the German trenches defending the coal mining village of Loos. The gas cloud that preceded the Highland advance was pendulous and largely stationary due to a distinct lack of wind, and ,upon emerging from the smudgy gas, the highlanders were pelted with machine gun fire and shrapnel from the defending German batteries. Not to be denied, the Scots gritted their teeth, and with an officer shouting faster boys! give them hell! the highlanders charged straight at the defenses. The Germans, unnerved by the stubborn courage of their kilted opponents, began to fall back through the village of Loos. The Camerons and the Black Watch, shouting their battle cry and charging down the main road of the village, then engaged the defending Germans in a series of savage battles for each and every house - hob-nailed boots, rifle butts, and bayonets being wielded with great enthusiasm by the vengeful Scots. By 8.00am the village was in Scottish hands. |
The Battle of the Somme - At the German Trenches by Jason Askew. (PC0 Very few of the British soldiers made it through the barbed wire defences, and even fewer to the German trenches. By the end of the first day the British losses were 60,000 men. |
Private Samuel Wassall of the 80th Regiment of Foot (Staffordshire Volunteers) at Fugitives Drift by Jason Askew. (PC) Private Wassall, whilst escaping the debacle of Isandhlwana, was being pursued by Zulu warriors as he made his way down the Buffalo River, the border between Zululand and Natal. Wassall rode his Basuto pony into the river, but upon hearing a cry for help and seeing a man from his own regiment drowning, he turned and made his way back to the Zulu side of the river, Quickly dismounting he tied his horse to a tress, swam into the river and rescued a private called Westwood as the Zulus were sweeping along the riverbank just at the moment the Zulus rushed forward. For his act of valour in the face of the enemy Private Samuel Wassall was awarded the first of the Zulu War Victoria Crosses. |
LZ S-17, Operation Market Garden, September 1944 by Jason Askew. (PC) 1 Border Regiment (1st Airborne division) unload their Horsa gliders, and push on to the next stage of the operation, forming a defensive perimeter around the LZs and DZs, ready for the next lift. |
Ulundi 4th July 1879 - Charge of the 17th Lancers by Jason Askew. (PC) The British force of 17,000 British and native troops, under the command of Lieutenant General Lord Chelmsford engaged over 22,000 Zulu warriors on 4th July 1879 at Ulundi. During the battle several thousand Zulus surrounded the British infantry which formed a square with the 17th Lancers at its centre. When the Zulus attack faltered the 17th Lancers passed out of the back of the square and were ordered to charge. The impact of the charge broke up what was left of the Zulu formations and the Zulu army dissolved in flight. The British casualties at the Battle of Ulundi were 3 officers and 79 men. but it is believed the Zulu losses were around 1500. |
|
Contact Details |
Sign Up To Our Newsletter!
This website is owned by Cranston Fine Arts. Torwood House, Torwoodhill Road, Rhu, Helensburgh, Scotland, G848LE Contact: Tel: (+44) (0) 1436 820269. Email: cranstonorders -at- outlook.com
|